
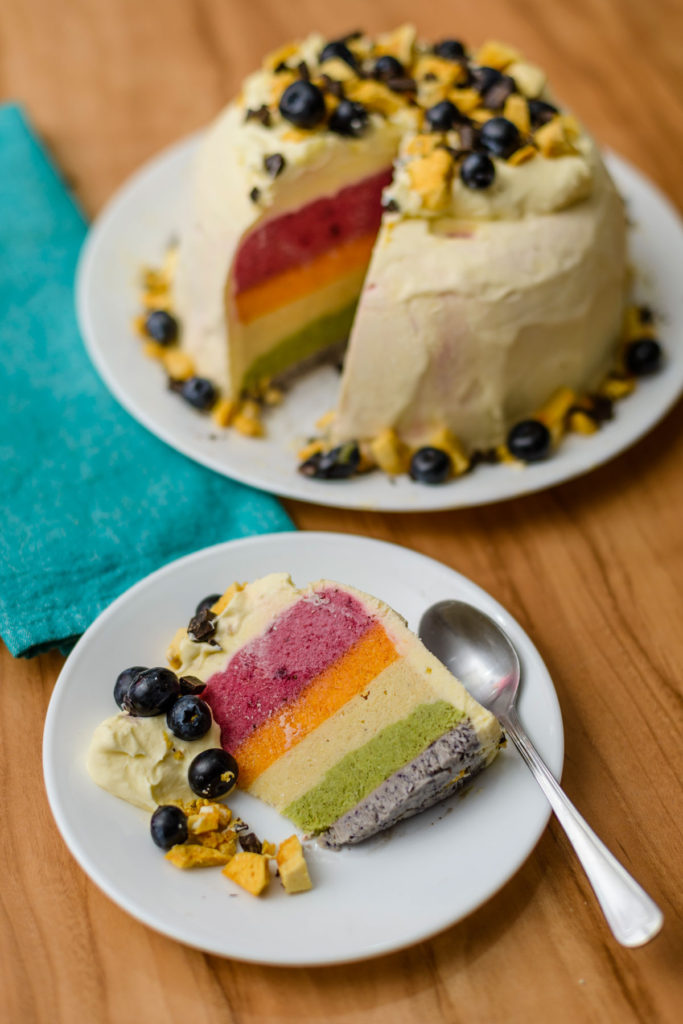
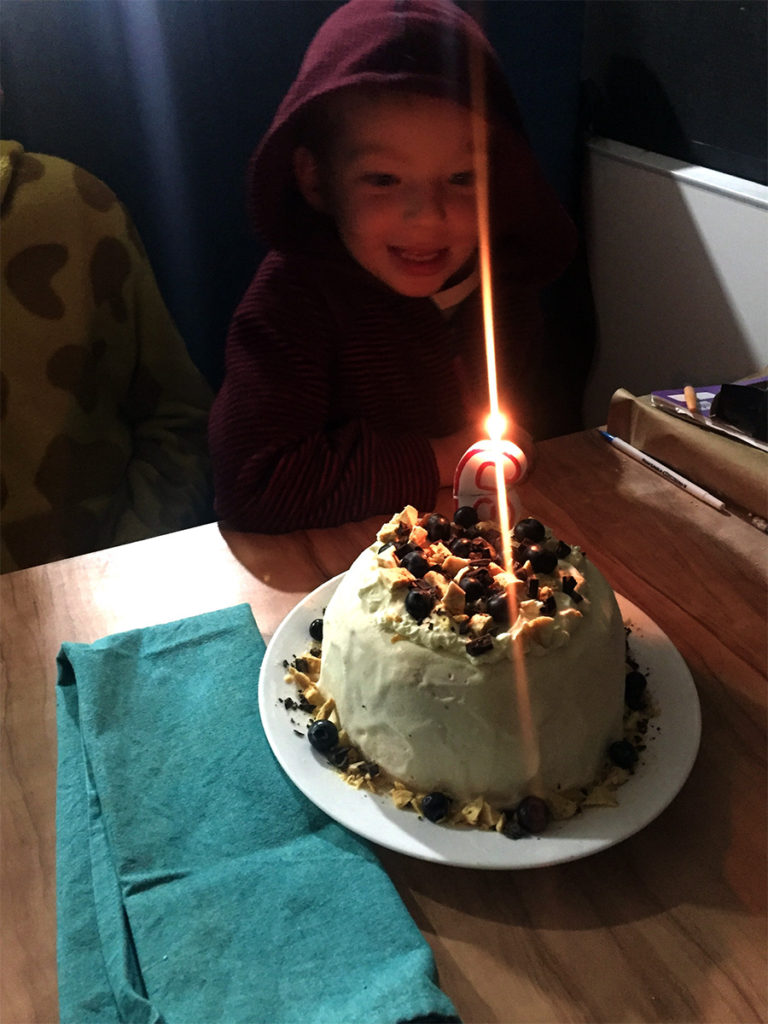
I posted a photo of our son’s 6th birthday cake – this homemade rainbow ice cream cake – on Facebook and Instagram. The cake is fructose free, and additive and preservative free. The rainbow colours are made from pureed fruit and vegetables. The response was incredible, and loads of people asked me to share the recipe, so here it is.
This recipe does come with a warning. It takes a bit of effort, and you have to make it in stages across a few days. BUT as you can see the results are so worth it – not just the cake, but the smile on his face made all the effort worthwhile. Also if you’re family are still on a journey to reduce sugar, then you will probably need to add some sugar alternatives, such as rice malt syrup, raw honey or 100% maple syrup to the flavours.
Of course, this sort of cake could have been so much easier if I just bought a tub of vanilla ice cream, divided it up and then stirred through different food colourings and then assembled. BUT, it would have also been loaded with added sugar additives and preservatives. You may think vanilla ice cream is harmless, but take a look at this post where I explain what’s in a simple vanilla ice cream (scroll down in the linked post to under the recipe to read about it). I also truly believe it is super important to teach our children how real foods can look and taste more delicious than anything that comes in a packet. This cake is shows that!
The other great thing about this cake is that you do not need to make it rainbow layers. You can make it any colour layers – like your favourite football team or a few of your child’s favourite colours.
Stages of Cake Development
Step 1 – Make the vanilla Ice Cream
It’s actually really simple to make your own ice cream. It takes about 25 minutes, then every couple of hours you have to stir it around but you usually only have to do this 3 times. And OMG it is delicious. You really don’t need a lot of this ice cream either. Because it’s made on full fat cream and full fat milk, it is so rich and filling.
Step 2 – Make Individual Rainbow Colours and Flavours
This involves creating fruit and veg purees and then stirring it through the vanilla ice cream to make your different coloured layers.
Step 3 – Assembly
Assembly is where you create the rainbow layers. I made one flavour (step 2), then did step 3 assembly, then went back to step 2, made another flavour, then assembly, and repeated this until I had made all the flavours of the rainbow.
Step 4 – Decorating
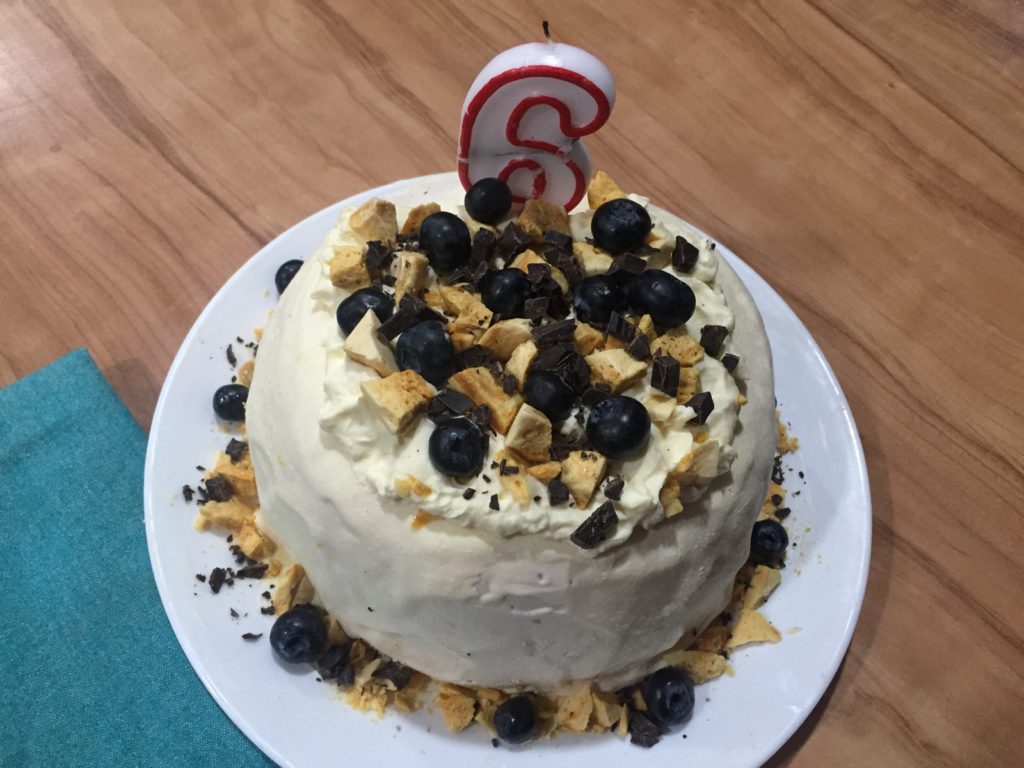
You don’t have to do this step but our son had been involved in making the ice cream and the flavours but I really wanted the cake to be a surprise for him. Decorating it would make it different from what he had been seeing as we made it. I asked him what one thing he would like as a decoration and his request was honey comb – a real rare food in our bus, it’s birthdays and christmas only. I chose to coat the outside in whipped cream, then decorate it with crumbled honeycomb, chopped 85% Lindt Dark Chocolate and fresh blueberries. The result was a total surprise to him and it made cutting it so much more exciting.
Stage 1 – Make The Vanilla Ice Cream
Ice Cream Ingredients
I made 2 litres of ice cream for this cake. The ingredient amounts below are for 1 litre. I made it in 2 x 1 ltr batches so it froze quicker, and because it’s more manageable in terms of the size of saucepan you need. I made the ice cream 4 days before I needed the cake.
For 1 ltr
- 600ml full fat cream
- 3 eggs
- 1/2 cup dextrose – you can purchase this cheaply from home brew shops or in the home brew section at your supermarket
- 300ml full fat milk
- 1/2 tspn vanilla powder – I use Honest to Goodness Organic Vanilla Powder
- 1 tblspn rice malt syrup
Remember – you will need to double the ingredients to make this cake.
Ice Cream Cake Method
- In a bowl, whisk together all ingredients except the rice malt syrup
- Pour it into a saucepan, and over medium heat, whisk it continually
- Keep whisking but do not let it boil – just steam. If it starts to boil lift it off the heat to stop and then lower the heat, put it back
- You need to keep whisking until it thickens – it took me about 15 minutes. Test if its thickening by picking some up on a spoon – if it pours straight off, you need to keep whisking, if some of it sticks to the spoon, then it’s thickening
- Take off the heat, and stir in the rice malt syrup (this is to prevent it from going rock hard)
- Allow to cool for about 10 minutes then pour into a container and place in the freezer
- Wait 2 hours, then pull out and stir. Repeat this process until it’s like a soft serve ice cream
- Separate the 2 litres of ice cream into 6 separate containers in preparation for Stage 2. I made only 5 colours but separated into 6 just so I had one spare up my sleeve. Pop all but one of the containers back in the freezer, and move onto stage 2.
Stage 2 – Make Individual Rainbow Colours and Flavours
This is how I made the flavours using real fruits and vegetables. I have offered some other alternative fruit and vegetable combinations you may like to try too. Please note, my family are used to the flavours of fruits and vegetables, but you may need to add a little sweetener to the flavours such as a splash of maple syrup, rice malt syrup or raw honey.
I chose to make 1 flavour, then assemble it in the bowl. Then I popped the bowl in the freezer to let it freeze a little before moving onto the next flavour. I believe this step is important to ensure you have nice clean layers.
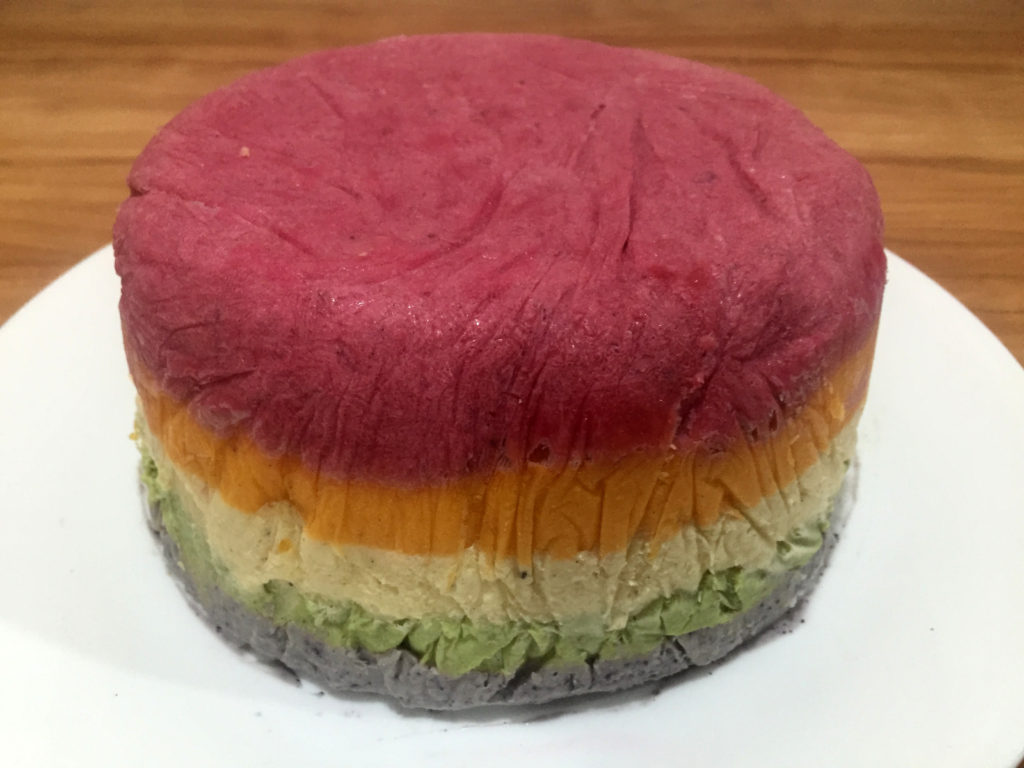
Red Layer
Ingredients
- 10 good sized frozen strawberries
- 3 baby beetroots
- 1 tblspn water
Method
- Throw all ingredients into a blender and blitz until smooth
- Stir through the soft serve ice cream until thoroughly coloured
- Go to the assembly stage for this first flavour
Alternatives
This was the only colour the kids weren’t happy with. They don’t really like beetroot so 3 beets were overkill. Me however, I love beetroot and really dug the beet flavour. You could probably achieve a really good red colour just by using mixed berries. You will need to have a mix of darker ones with the strawberries because strawberries alone create a pink colour not red.
Orange Layer
Ingredients
- 2 oranges
- 1 carrot
Method
- Peel the oranges, cut into smaller pieces suitable for your blender
- Cut carrot into chunks suitable for your blender
- Blitz until smooth
- Go to the assembly stage
Alternatives
This flavour was enjoyed but if you wish, you could probably just go with oranges. Personally, I am always looking for ways to get extra veg in, so you could even throw in a small amount of orange sweet potato.
Yellow Layer
Ingredients
- 1 serve of your vanilla ice cream (this is a natural yellowy colour as it is)
Method
- Go to the assembly stage
Alternatives
If you wanted to boost the yellow colour in this, I would suggest stirring through an egg yolk through your vanilla soft serve.
Green Layer
Ingredients
- 2 kiwi fruit
- 1 big handful of baby spinach
- 1 tblspn water
Method
- Peel the kiwi fruits, cut into smaller pieces suitable for your blender
- Add in the baby spinach and water
- Blitz until smooth
- Go to the assembly stage
Alternatives
You may also like to try avocado and baby spinach
Purple / Blue Layer
Ingredients
- 1/2 cup fresh blueberries
- 1 tblspn water
Method
- Throw blueberries and water into blender
- Blitz until smooth
- Go to the assembly stage
Alternatives
Mulberries or dark purple grapes may work well as alternatives.

Stage 3 – Assembly
I used a round glass pyrex dish to make this cake so I could see how it was looking. The first thing I did was mark little lines on the outside of the bowl so I could see where each layer should come to. I did this so I could make sure each layer was roughly even. Then I layered the glass dish with glad wrap, so I could remove the cake more easily when it was set.
With the assembly, you need to allow each layer to freeze firmly enough before adding the next layer. This will ensure you have nice clean lines to show the rainbow layers. Here’s what I did.
- Made the red layer per step 2
- Spoon it out of the individual container, and put in the bowl. Use a cooking spatula to smooth out the top.
- Pop the bowl in the freezer until it’s firm (about 2 hours)
- Take out another individual container of vanilla ice cream, allow it to soften slightly. This will depend on the temperature of the day.
- Then make the orange layer per step 2
- Repeat steps 2 and 3
- Take out another individual container of vanilla ice cream, allow it to soften slightly. This will depend on the temperature of the day.
- Then make the yellow layer per step 2
- Repeat steps 2-4 until you’ve made all colours
- When you’ve made all colours, allow the cake to freeze hard for 1 day.
Stage 4 – Decorating
This stage is not really 100% necessary but I feel it really made the cake extra special. On the outside you’d have no idea it was a rainbow cake until you cut into it. I did the first part of the decorating the day before I needed the cake, then added the toppings about 5 minutes before I served it.
Decorating Ingredients
- 1 x 600ml full fat cream
- Fresh blueberries (or use any sort of fruit – bananas, strawberries etc, or even a couple of fruits) – for topping
- Honeycomb – for topping
- 2 x squares of 85% Lindt Dark Chocolate, cut into small chunks – for topping
Decorating Method
Ensure the cake is really frozen before attempting to do this decoration.
- Take the cake out of the freezer and let it sit for about 5-10 minutes (depending on the temperature outside). You need the cake to soften slightly around the edges, so you can grab the glad wrap and pull it out of the bowl.
- While you’re waiting for it to soften slightly, whip the cream so peaks form – it needs to be firm. Keep about 1/2 cup aside (pop it in the fridge)
- When the cake is softened slightly, grab the glad wrap and gently lift the cake out of the bowl. Place it on your bench, then place a plate over the bottom of the cake. Hold your hand on the plate, then turn it upside down so the cake is sitting on top of the plate.
- Gently peel off the glad wrap
- Using a wide cooking spatula, smooth the cream all over the cake. I put a big dollop in the centre of the top of the cake and worked around, down the sides. Depending on the outside temperature, you may need to move really fast on this. It was 28 degrees in Alice Springs where I was making this, and the cream kept sliding off the cake. If this happens, stick it back in the freezer quickly. Wait 20 minutes for the cream to harden a bit from being in the freezer, then use the spatula again to smooth the cream around the cake. I had to do this 3 times due to the heat just to make sure it was all evenly coated
- Allow the cream layer to freeze to the cake at least overnight
From Decorating To Serving
- Take the cake out of the freezer about 15* minutes before you’re ready to serve (*use your judgement on this depending on the temperature. The aim is for the cake to still be frozen but not rock hard)
- About 5 minutes before you’re due to serve, top with the last 1/2 cup of whipped cream, sprinkle on the honeycomb, chocolate and blueberries.
- Sprinkle some honeycomb and blueberries around the base of the cake too
- Done! You’re now ready to serve. Add a candle – be sure not to drop the candle on the benchtop before you put it in the cake, otherwise you have a magnificent cake with a candle which is blue tacked back together – like ours.
That’s it – done! We’re still eating this cake 4 days later. It’s a great cake for making for a lot of people or if you decide you want ot have dessert a few times.