
Preparing ahead for lunchboxes on the weekend is the best way to reduce time and stress in packing lunchboxes. It’s also a great way of minimising packet foods and taking back control of the food we’re putting in our kids bodies. And it also saves you money too. Winning all round! I hope this No Bake Freezer Muesli Slice provides you with some lunchbox inspiration.
This recipe makes about 30 lunchbox sized portions. Even if I wanted to put this in all 4 of our lunchboxes everyday, I would still have leftovers for next week. If you do this kind of preparation every week, you’ll always have an additive and preservative free snack on hand for your lunchboxes.
Note, if you’re family are new to reducing sugar, you may wish to increase the rice malt syrup in the slice and the rapadura sugar in the icing.
Ingredients
Slice
- 1 cup rolled oats
- 1/2 cup puffed rice
- 1/2 cup puffed corn
- 1/2 cup dessicated coconut
- 1 cup LSA*
- 1/4 cup sultanas
- 1/4 cup pepitas, roughly chopped
- 150g butter
- 3 tblspns tahini
- 3 tblspns rice malt syrup
- 4 dates chopped in small pieces
* If your school won’t allow LSA in foods, replace this with an extra 1/2 cup dessicated coconut, 1/4 cup linseed meal, 1/4 cup sunflower seed meal
Icing
- 125g cream cheese
- 50g butter softened
- 1 tblspn rapadura sugar
- 1 tspn vanilla powder
- 2 tblspns corn starch
Method
Slice
- Place all dry ingredients (from rolled oats to pepitas) in a bowl and mix well
- Over low medium heat, melt butter, tahini, rice malt syrup and dates together. Stir continuously to make a delicious thick caramel sauce – about 5-8 minutes
- Pour sauce over the dry ingredients, and combine really well so all ingredients are sticky
- Line a slice tray with baking paper, then pour the mixture into the tray. Press down firmly with your hands – this is a great activity for the kids. You can also use the back of spoon to push down firmly
- Place in freezer for minimum 30 minutes
- About 20 minutes into the slice being in the freezer, make the icing
Icing
- Cream the butter and cream cheese
- Add the rapadura sugar and vanilla powder and mix until well combined (the rapadura adds a nice caramel taste to the icing)
- Add in the corn starch (the corn starch makes the icing a stiffer), and blend in well
- Spread the icing in an even layer over the slice. I find it’s easier to place the icing in the centre of the slice, then use a small spatula to spread the icing out from the middle to the edges
- Pop it back in the freezer for about 1 hour
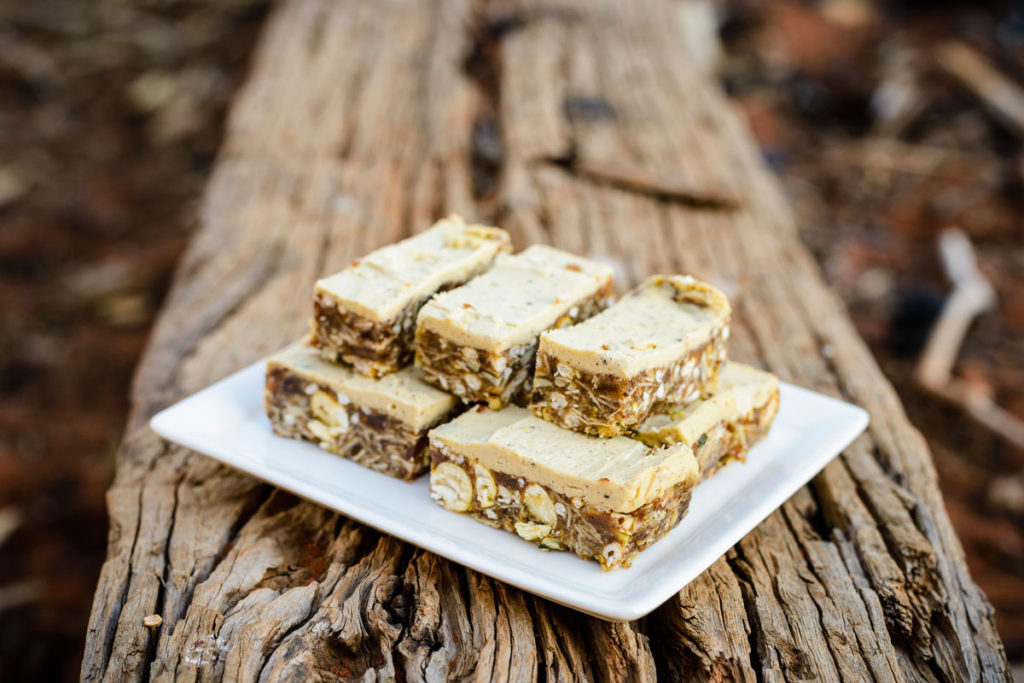
- The slice is now ready to be cut into the sizes you wish. I found it easier to cut it into 6 strips along the long side, then 5 along the short side. This creates finger sized pieces which are easy to pack and for little hands to eat. Pop the pieces in an air tight container and put it back in the freezer. If you need to put pieces on top of each other, separate them with baking paper.
Freezing / Storage
This slice is designed to be kept in the freezer and popped straight into the lunchbox. By the time recess comes around, the slice has softened a little and perfect to eat. Our kids also loved eating it straight out of the freezer. Note, in Summer months, it’s recommended you use an ice brick to keep the lunchbox cold.
2 Other Ways
- Drop the icing altogether and just have it as the slice on its own
- Change up the dried fruit and pepitas. You could use goji berries, sunflower seeds or a combination of all of them.
Story behind this recipe
Life on the road sometimes means we don’t get to restock our pantry. This recipe came about because I needed to make something for the coming weeks lunchboxes but our pantry supplies were getting low. So I kind of just pulled out what we had in the pantry and popped it on the kitchen bench, then started to play about. I knew from when I was created my Chewy Caramel Rice Bar (my version of LCM bar) that tahini and rice malt syrup make a caramel type sauce, so I just built on that. Then added in a mix of the dry ingredients I had. The idea of having an icing was because I was thinking about those muesli bars which have a yoghurt topping (take a look at the ingredient list on those!). Our kids loved this slice instantly, and said it was the best one I had made – ever. The photo was taken on an older sleeper encasing a fire pit at the camp ground we were at in Yulara, NT.
Just a reminder, you don’t need to be a master chef, or have a big spotless kitchen to make awesome nutritious meals or snacks for your family.